What’s VisualizeHDR in UE4
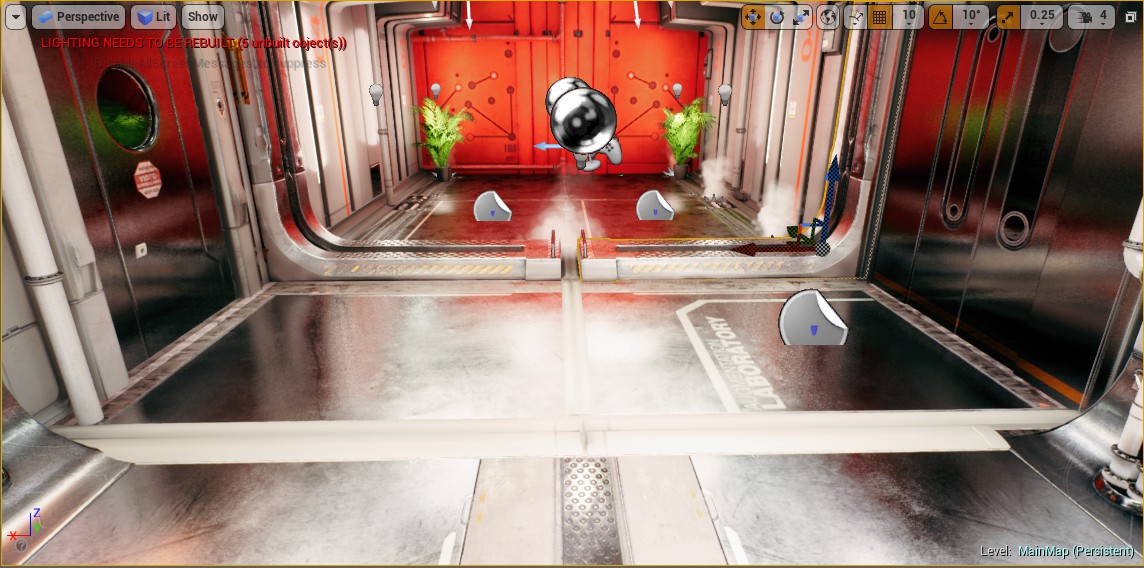
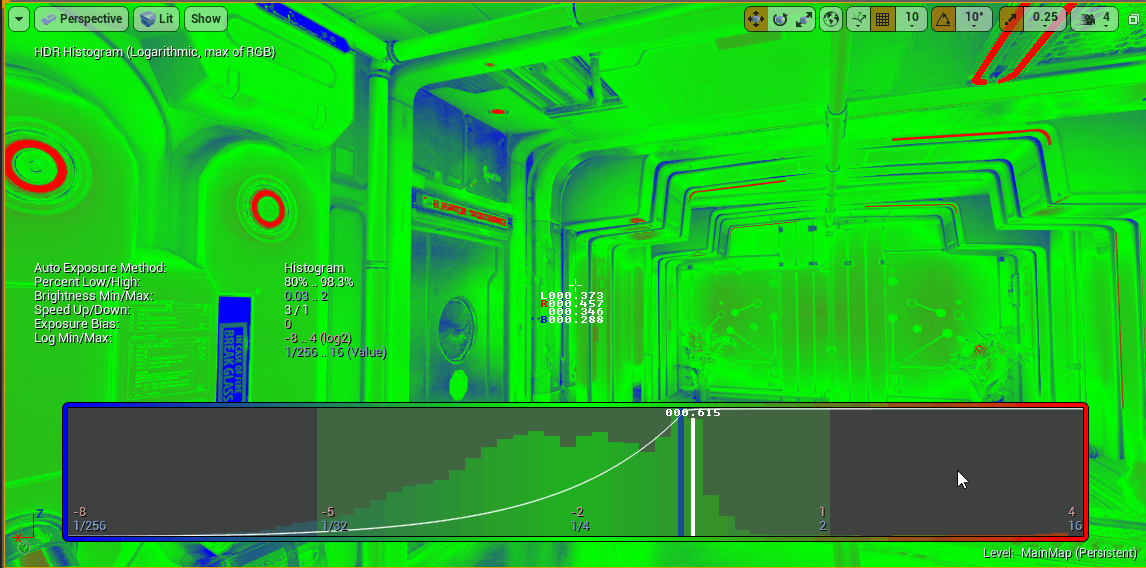
图一是官方的一个SciFiHallway场景。图二是SciFiHallway场景开启visualizehdr后的动效图。
从功能性角度看,visualizehdr是用来查看hdr信息的调试功能。具体来说:
- 通过将hdr的数值映射到rgb上,颜色越红表示hdr的值越大,颜色越蓝表示hdr的值越小
- 显示当前画面的中间像素的hdr的明度,红绿蓝通道的hdr数值(十字标志,底下有L,RGB的数值)
- 显示当前画面的hdr直方图
- 显示自动曝光的数值(直方图区域的白色竖线)
接来主要来分析hdr到rgb的映射和显示hdr信息,直方图的生成,自动曝光等不在讨论范围内。
浅析UE4中VisualizeHDR
hdr到rgb的映射
hdr到rgb的映射的过程是,先计算hdr的rgb通道的最大值,然后取对数,最后colorize化。
1
2
3
4
|
float4 SceneColor = Texture2DSample(PostprocessInput0, PostprocessInput0Sampler, UV);
float LuminanceVal = max(SceneColor.r, max(SceneColor.g, SceneColor.b));
OutColor = float4(Colorize(ComputeHistogramPositionFromLuminance(LuminanceVal)), 1.0f);
|
取对数。在UE4计算直方图的过程中,hdr的取值限定1/255 = 2^(-8) .. 16 = 2^4, 即[-8,4], 区间长度是12。
从UE4对应的c++代码得出,EyeAdaptationParams[2].x = 1 / 12, EyeAdaptationParams[2].y = 8 / 12. 所以,
整个hdr的区间映射如下:[0,16+] -> [-8,4] -> [0,1]
1
2
3
4
5
6
7
8
9
10
11
12
13
14
15
|
float4 EyeAdaptationParams[3];
float ComputeHistogramPositionFromLuminance(float Luminance)
{
return log2(Luminance) * EyeAdaptationParams[2].x + EyeAdaptationParams[2].y;
}
|
Colorize化。0 = cold(blue), 0.5 = middle(green), 1 = hot(red)。
1
2
3
4
5
6
7
8
9
10
11
12
|
float3 Colorize(float x)
{
x = saturate(x);
float3 Heat = float3(1.0f, 0.0f, 0.0f);
float3 Middle = float3(0.0f, 1.0f, 0.0f);
float3 Cold = float3(0.0f, 0.0f, 1.0f);
float3 ColdHeat = lerp(Cold, Heat, x);
return lerp(Middle, ColdHeat, abs(0.5f - x) * 2);
}
|
显示hdr信息
显示hdr信息。就是显示当前画面的中心hdr的明度,rgb各通道的数值和十字标志。
1
2
3
4
5
6
|
float CrossHairMask = PixelPos.x == ViewportCenter.x || PixelPos.y == ViewportCenter.y;
float2 DistAbs = abs(PixelPos - ViewportCenter);
float Dist = max(DistAbs.x, DistAbs.y);
float DistMask = Dist >= 2 && Dist < 7;
OutColor.xyz = lerp(OutColor.xyz, float3(1, 1, 1), CrossHairMask * DistMask);
|
先说下Screen Space Coordinates空间。如果当前画面的分辨率是1980x1020, 则屏幕左上角为(0,0),右下角为(1979,1019), 中间点为(994, 509)。
十字标志,由4条长度为5个像素的直线构成,其中两条在中间点的水平线上,另外两条在中间点的竖直线上。两两关于中间点对称,并距中间点2个像素的距离。
UE4先计算出十字标志的掩码,取值(0,1),如果是0,保持原来的颜色值,如果是1,则替换成白色。掩码的计算具体是,是将中间点的水平线和竖直线的像素掩码CrossHairMask标志为1,
然后根据与中间点距离的(x,y)分量的最大值,如果落入[2,7),则将DistMask标志为1。最终十字标志的掩码是,CrosssHairMask * DistMask. 最后,通过lerp操作取对应片段的颜色。
显示hdr的明度,rgb各通道数值。UE4中使用了一个高为8个像素的minifont掩码纹理,该纹理里包含了A-Z字母和一些基本的常用符号,其中每个字符的宽度也是8个像素宽。即minifont中,
每个字符掩码由8x8区域表示。

1
2
3
4
5
6
7
8
9
10
11
12
13
14
15
| /// MiniFontCommon.usf:
// for printf debugging in the shader
// @param LeftTop - is advanced, in pixels
void PrintCharacter(int2 PixelPos, inout float3 OutColor, float3 FontColor, inout int2 LeftTop, int CharacterID)
{
uint2 Rel = (uint2)(PixelPos - LeftTop);
FLATTEN if (Rel.x < 8 && Rel.y < 8)
{
OutColor = lerp(OutColor, FontColor, MiniFontTexture.Load(int3(CharacterID * 8 + Rel.x, Rel.y, 0)).r);
}
LeftTop.x += 8;
}
void PrintFloat(int2 PixelPos, inout float3 OutColor, float3 FontColor, int2 LeftTop, float Number);
void PrintFloatNoFraction(int2 PixelPos, inout float3 OutColor, float3 FontColor, int2 LeftTop, float Number);
|
MiniFontCommon.usf提供了三种辅助函数,分别用来显示单一字符,xxx.yyy格式的浮点数和xxxxxx格式的浮点数。
简要解析下PrintCharacter,该辅助函数表示以像素PixelPos为起点的,向右向下各8个像素的区域内,如果对应的MiniFont纹理的数值是1, 则当前的片段为FontColor,否则为OutColor.
PrintFloat,PrintFloatNoFraction辅助函数基本思想一下,只是比PrintCharacter函数多了一步提取浮点数数值对应的字符序列。
显示Histogram
显示Histogram,可以理解为四个显示:显示边框, 显示bars, 显示曲线和显示eye adaptation。
显示边框。先算出与边框的像素距离,根据像素距离分别画出像素为1px的外边,像素为HistogramOuterBorderpx的框和像素为1px的内边。
1
2
3
4
5
6
7
8
9
10
11
12
13
14
15
16
| float BorderDistance = ComputeDistanceToRect(PixelPos, HistogramLeftTop, HistogramSize);
OutColor.xyz = lerp(float3(0, 0, 0), OutColor.xyz, saturate(BorderDistance - (HistogramOuterBorder + 2)));
OutColor.xyz = lerp(BorderColor, OutColor.xyz, saturate(BorderDistance - (HistogramOuterBorder + 1)));
OutColor.xyz = lerp(float3(0, 0, 0), OutColor.xyz, saturate(BorderDistance - 1));
if(BorderDistance > 0)
{
return;
}
|
显示bars。先计算当前的bucket的直方图值,除以直方图的最大项值。即归一化直方图。直方图的y轴朝上的,所以1-InsetUV.y。
如果1-InsetUV.y小于等于归一化的LocalHistogramValue,则以0.5系数混合当前颜色和bucket对应的colorize数值。
1
2
3
4
5
6
| float LocalHistogramValue = GetHistogramBucket(HistogramTexture, Bucket) / ComputeHistogramMax(HistogramTexture);
if(LocalHistogramValue >= 1 - InsetUV.y)
{
// histogram bars
OutColor.xyz = lerp(OutColor.xyz, Colorize(InsetUV.x), 0.5f);
}
|
显示曲线。从代码看,该tonemapping曲线似乎并不在使用。忽略。
1
2
3
4
5
6
7
8
| // HDR luminance >0
float LuminanceVal = ComputeLuminanceFromHistogramPosition(InsetUV.x);
// HDR > 0
float3 AdpatedLuminance = EyeAdaptationResult * float3(LuminanceVal, LuminanceVal, LuminanceVal);
// 0..1
float3 TonemappedLuminance = FilmPostProcess(AdpatedLuminance);
float3 DistMask = saturate(1.0 - 100.0 * abs(TonemappedLuminance - (1.0 - InsetUV.y)));
OutColor = lerp(OutColor, float4(1, 1, 1, 0), float4(DistMask, 0.0));
|
显示eye adaptation。即在eyedapation的数值位置画一条像素4px的竖线。白色为当前的eyeadaption,蓝色为当前算出的eyeadaption目标值。
即移动鼠标,白色的竖线会跟着蓝色的线动,知道两者重合。
1
2
3
4
5
6
7
8
9
10
11
12
13
14
15
| float ValuePx = ComputeHistogramPositionFromLuminance(1.0f / EyeAdaptationTarget) * HistogramSize.x ;
if(abs(InsetPx.x - ValuePx) < 3)
{
// blue line to show the clamped percentil
OutColor = lerp(OutColor, float4(0, 0, 1, 0), 0.5f);
}
// eye adaptation
float EyeAdaptationValue = ComputeHistogramPositionFromLuminance(1.0f / EyeAdaptationResult);
float ValuePx = EyeAdaptationValue * HistogramSize.x;
PrintFloat(PixelPos, OutColor.xyz, float3(1, 1, 1), HistogramLeftTop + int2(ValuePx + - 3 * 8 - 3, 1), EyeAdaptationValue);
if(abs(InsetPx.x - ValuePx) < 2 && PixelPos.y > HistogramLeftTop.y + 9)
{
// white line to show the smoothed exposure
OutColor = lerp(OutColor, float4(1, 1, 1, 0), 1.0f);
}
|
在Unity中重新实现VisualizeHDR
在Unity复现UE4的VisualizeHDR过程中,主要是把输入传到对应的着色器即可。见Unity’s Visualize HDR
效果如图:


小结
UE4的VisualizeHDR里,很有趣的是miniFont的调试功能,对于coder而言,能直观的看到像素的真实数值带来很多的好处。
美中不足的是,只能查看中间像素的数值。HDR Display Nvidia的
SDk是根据鼠标位置来显示当前片段的相关数值。

References